Forget everything you thought you knew about ice cream makers, refined sugar, and heavy cream. Prepare to be amazed by the simple, glorious invention that is banana ice cream, affectionately known as "nice cream." This dairy-free, one-ingredient wonder is not just a passing trend; it's a timeless delight that brings joy to both kids and adults. Whether you're a seasoned health enthusiast or just looking for a refreshing, guilt-free treat, mastering the art of perfect nice cream is a game-changer.
From its humble beginnings as a viral sensation to its recent resurgence, notably featured on shows like PBS Kids' Daniel Tiger, banana ice cream proves that sometimes, the simplest ingredients yield the most satisfying results. Imagine a treat with the rich, creamy texture of traditional soft-serve, yet made solely from frozen bananas. Intrigued? Let's dive into your ultimate guide to achieving that perfectly smooth, naturally sweet banana ice cream every single time.
The Magic of One-Ingredient Banana Ice Cream
At its heart, nice cream is an extraordinary example of culinary alchemy. By simply blending frozen bananas, you transform them into a luscious, velvety dessert that mimics the texture and indulgence of conventional ice cream without any dairy, added sugar, or complicated equipment. This makes it an ideal option for those with dietary restrictions, vegans, or anyone seeking a healthier alternative to sugary desserts.
The beauty lies in its accessibility. You don't need an expensive ice cream maker; a standard food processor or a powerful blender will do the trick. The inherent sweetness and creamy consistency of ripe bananas create a naturally delicious base, making it a fantastic canvas for endless flavor explorations. It’s a treat that feels indulgent but is packed with the goodness of fruit, offering potassium, fiber, and vitamins.
Mastering the Basic Banana Ice Cream Recipe: Step-by-Step
Creating the ultimate banana ice cream is straightforward, but a few key steps make all the difference between a good batch and an unforgettable one. Follow this guide for a consistently smooth and creamy result.
Step 1: Prep & Freeze Your Bananas for Success
This initial step is perhaps the most crucial. The quality of your frozen bananas directly impacts the final texture and flavor of your nice cream.
- Choose Wisely: The Riper, The Better. Just like with banana bread, the best banana ice cream starts with very ripe bananas. Look for bananas with plenty of brown spots on their skins. These bananas are naturally sweeter and have a more intense banana flavor, eliminating the need for any added sweeteners.
- Peel Before Freezing. This might sound obvious, but trust us, trying to peel a rock-hard frozen banana is a battle you don't want to fight. Always peel your bananas before freezing them.
- Slice for Convenience. While you can freeze whole peeled bananas, slicing them into smaller chunks (about 1-inch thick) before freezing will make them much easier to blend later, reducing strain on your appliance.
- Freeze Thoroughly. Arrange the banana slices in a single layer on a parchment-lined tray (to prevent sticking) and freeze until solid, typically 4-8 hours, or ideally overnight. Once solid, transfer them to an airtight container or freezer bag to prevent freezer burn. This ensures they are perfectly chilled and ready for blending.
Step 2: The Thaw & Chop Dance
Resist the urge to throw fully frozen banana chunks directly into your food processor. A slight thaw is essential for a smooth blend and to protect your appliance.
- A Gentle Thaw. Remove your frozen banana slices from the freezer and let them sit on your counter for about 10-15 minutes. This softens them just enough to be processed without becoming too watery. If they’ve been in the freezer for a very long time, you might need an extra 5 minutes.
- Chop If Necessary. If you froze whole bananas or large chunks, give them a quick chop into smaller pieces after the partial thaw. This aids in more even blending.
Step 3: The Blending Revelation
Now for the transformation!
- Food Processor is King. While a high-speed blender can work, a food processor is generally preferred for making banana ice cream. It excels at breaking down the dense frozen fruit into a creamy consistency without the need for additional liquid, which can thin out your nice cream.
- Process Until Smooth. Place the partially thawed, chopped bananas into your food processor. Begin processing. Initially, the bananas will look crumbly and like small frozen bits. Don't worry! Keep going. You'll need to stop and scrape down the sides of the bowl frequently (every 30-60 seconds) to ensure everything is evenly incorporated.
- Watch the Transformation. After a few minutes (typically 3-5 minutes, depending on your machine), the mixture will gradually become thicker, creamier, and lighter in color, eventually resembling a soft-serve ice cream texture. This is your cue that it's ready!
Step 4 (Optional): Achieving Scoopable Perfection
Right after blending, your banana ice cream will have a delightful soft-serve consistency, perfect for immediate enjoyment. However, if you prefer a firmer, scoopable texture akin to traditional hard ice cream, a quick trip back to the freezer is in order.
- Freeze Briefly. Transfer the soft-serve nice cream into a freezer-safe container. Place it in the freezer for an additional 30 minutes to 2 hours.
- The Golden Rule: Don't Over-Freeze! This is critical. Leaving your nice cream in the freezer for too long (e.g., overnight) will turn it into a solid, unyielding block of ice. If this happens, simply let it sit on the counter to thaw slightly before enjoying, or re-process it in your food processor for a few seconds.
Pro Tips for the Creamiest Banana Ice Cream Ever
While the basic steps are simple, these insider tips will elevate your banana ice cream game.
Ripeness is Key: The Brown Spot Advantage
We can't stress this enough. Under-ripe bananas will result in a less sweet, potentially gummier nice cream. Overripe bananas, those mottled with brown spots, are bursting with natural sugars and contribute to a richer, creamier texture and more profound banana flavor. Embrace the spots!
Don't Rush the Thaw
If your bananas aren't breaking down easily in the food processor, they're likely still too frozen. Stop the machine, give them another 5-10 minutes on the counter, and try again. As a last resort, you can add a tiny splash (1-2 tablespoons) of milk (dairy or plant-based) to help the blending process, but aim to use just bananas for the purest, thickest consistency.
Equipment Matters: Food Processor vs. Blender
As mentioned, a food processor is generally superior for nice cream. Its wider base and S-blade are designed to continuously churn and scrape the frozen fruit, creating that signature creamy texture without requiring much, if any, added liquid. If you're using a blender, especially a standard one, you might find yourself needing to add more liquid and constantly stopping to push the mixture down, which can result in a thinner consistency. For more on this, check out our guide on One-Ingredient Banana Ice Cream: Creamy, Healthy, No Dairy.
Serve Immediately or Store Smart
Nice cream is truly at its best when enjoyed immediately after blending. If you have leftovers, store them in an airtight container in the freezer. When ready to eat, you'll likely need to let it thaw for 15-30 minutes on the counter, or give it a quick re-blend in your food processor to restore its creamy texture.
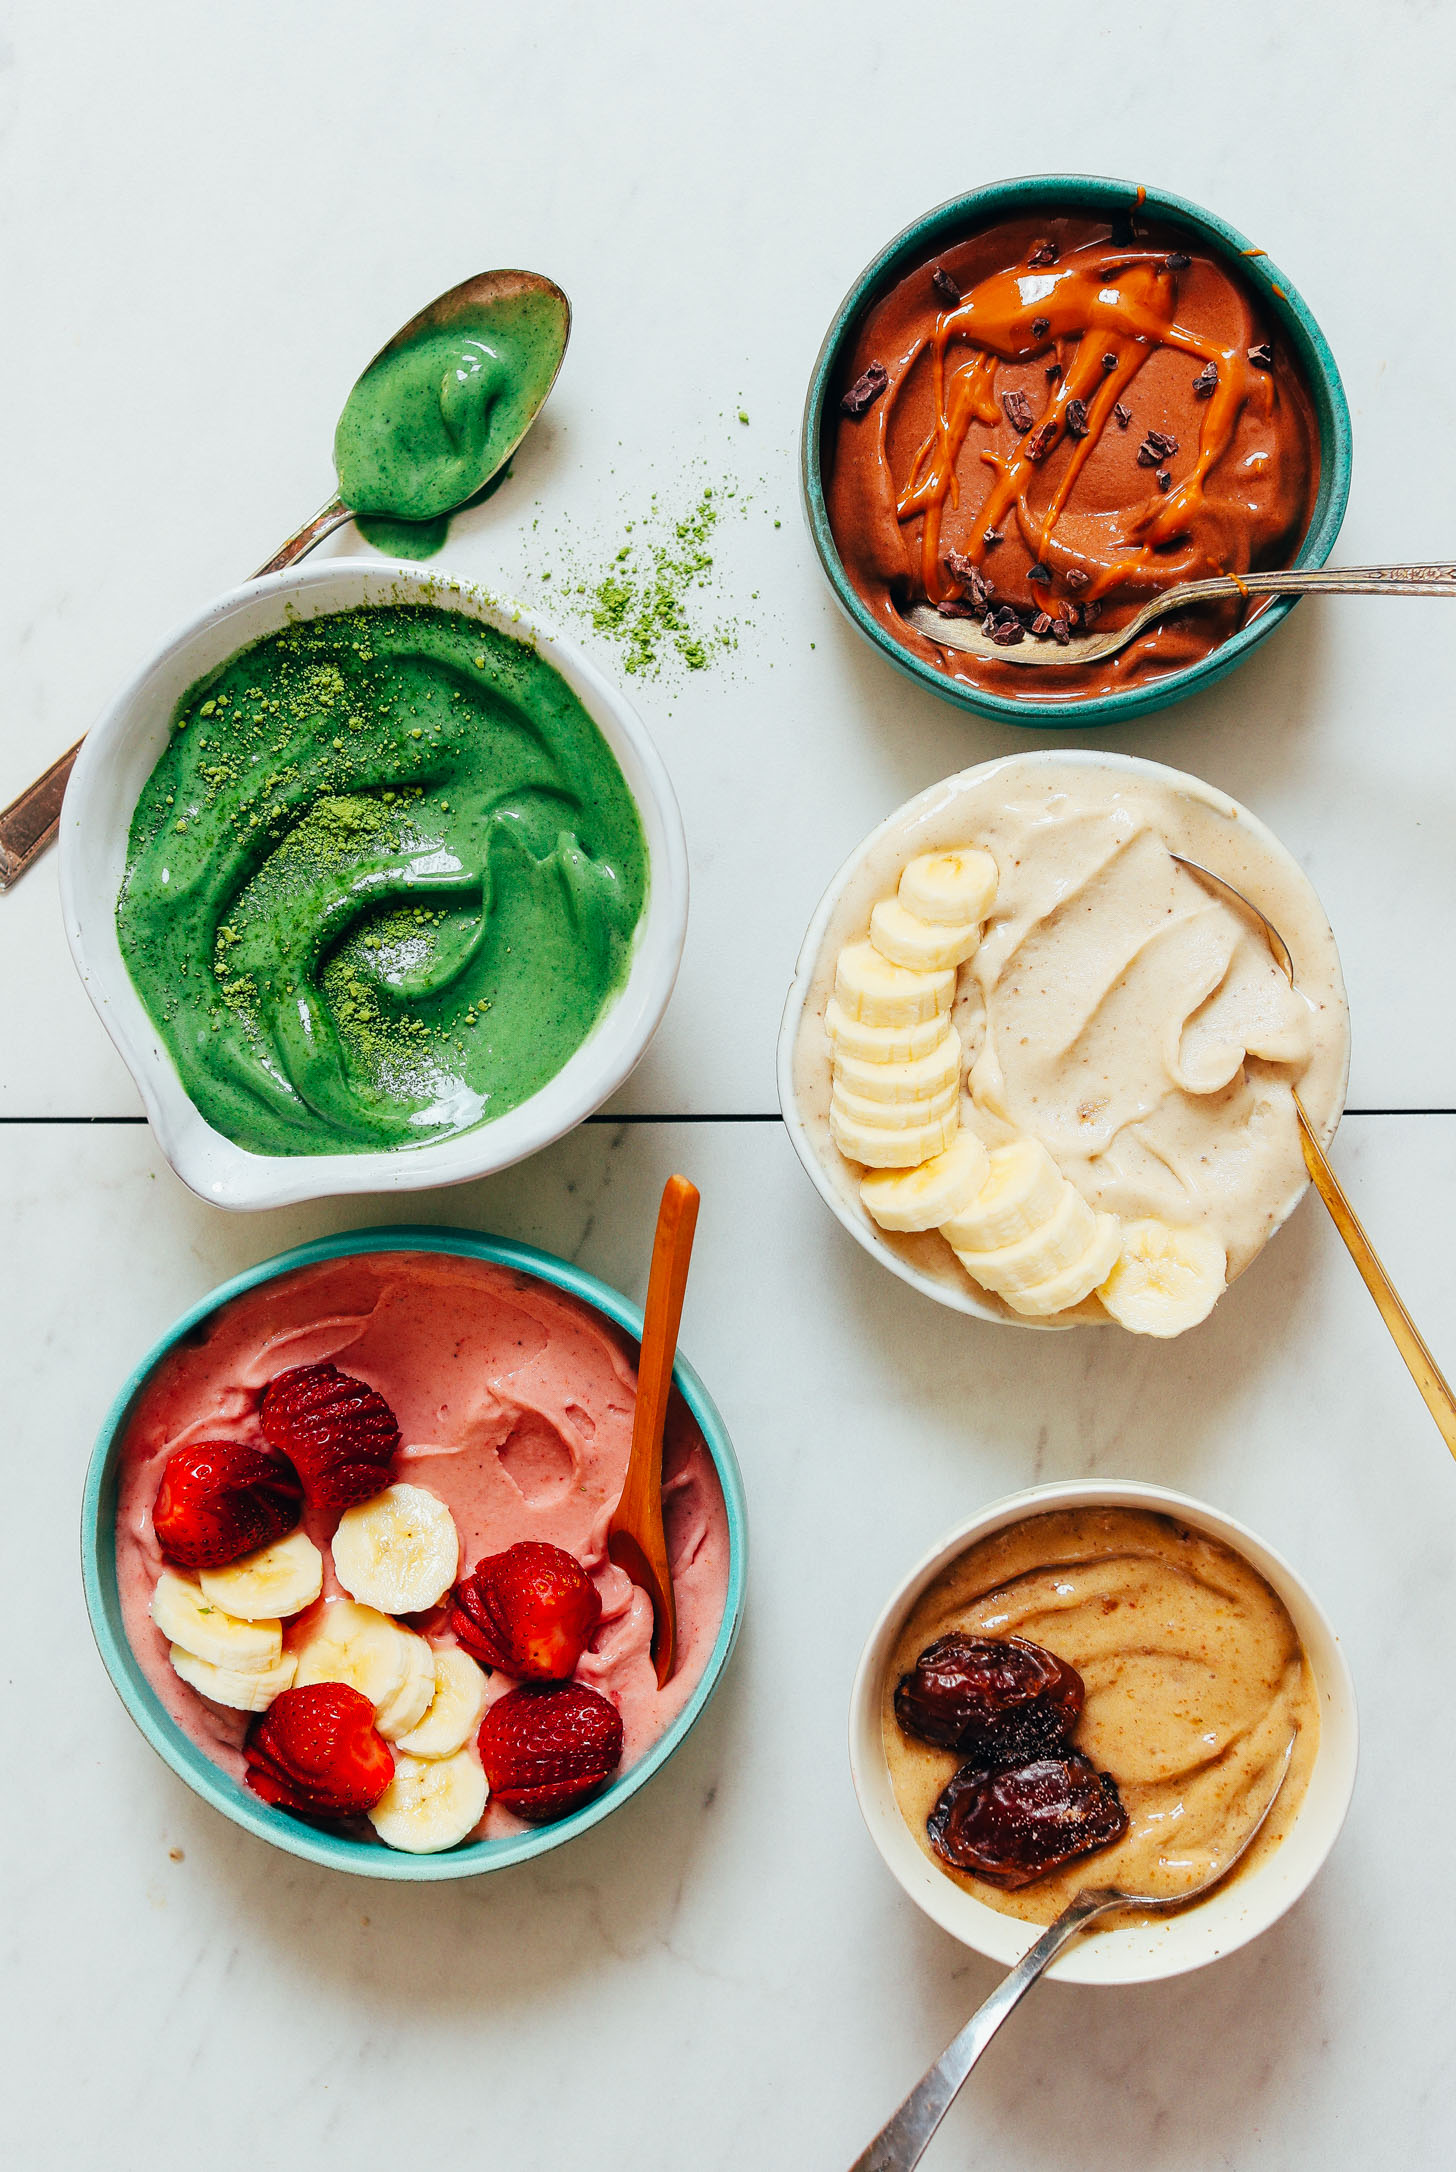
The Art of Customization: Endless Flavor Possibilities
Once you've mastered the basic banana ice cream, the world of flavors is your oyster! The versatility of nice cream is one of its most appealing features. You can easily add extra ingredients to create unique and delicious variations:
- Chocolate Lover's Dream: Add 1-2 tablespoons of cocoa powder or a handful of chocolate chips during the last minute of blending.
- Fruity Fusion: Blend in a handful of frozen berries (strawberries, blueberries, raspberries) for a vibrant, tangy treat.
- Nutty Indulgence: Swirl in a tablespoon of your favorite nut butter (peanut butter, almond butter, cashew butter) for added richness and protein.
- Spice it Up: A pinch of cinnamon, nutmeg, or pumpkin pie spice can add a warm, comforting note.
- Tropical Twist: Add a splash of coconut milk or a handful of frozen mango chunks.
- Coffee Kick: A teaspoon of instant coffee granules or a shot of cold espresso for a mocha flavor.
For even more inspiring ideas and to explore why banana ice cream is experiencing such a delightful comeback, dive into Why Banana Ice Cream is Back: Easy Recipe & Endless Flavors.
Conclusion
Perfect banana ice cream is more than just a recipe; it's a testament to the power of simplicity and natural ingredients. This healthy, dairy-free dessert offers a delightful escape on a hot day or a guilt-free indulgence anytime. With just one ingredient and a few simple steps, you can create a creamy, satisfying treat that rivals traditional ice cream. So, grab those spotty bananas, fire up your food processor, and embark on your journey to nice cream bliss. Your taste buds (and your body) will thank you!
